Start from empty Unity project
The SDK provides to you an empty Unity project which is already set up for use and contains all the files you need to communicate with the F4F framework. It is also set up using our recommended folder and asset structure (see Recommended folder structure for Unity game assets). The empty Unity project is located at C:\Fun4Four\NZilla\EmptyUnityGame. You can start developing by using this empty project, you'll just have to rename some files during the process to get your game ID (see Requesting your game IDs, see Preparing the submission package) applied to your game. However, you're also free to start from scratch and use a clean or preexisting Unity project by yourself (see Importing the TABUnitySDK package into a clean or preexisting Unity project).
- If you're running into an issue, where after inclusion of the TAB SDK components, your Unity project will fail saying it can not find assemblies like System.Windows.Forms - do not panic. Its a simple settings change. Go to File -> Build Settings -> Player Settings -> Other Settings -> and change compatibility level from ".NET 2 subset" to ".NET 2". Your project should now build fine.
- Note that games developed for the Fun4Four need to be designed for a resolution of 1920 x 1080 pixels.
Importing the TABUnitySDK package into a clean or preexisting Unity project
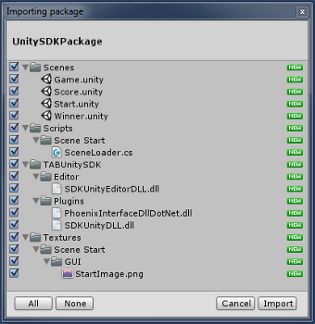
Importing the TABUnitySDK Package into Unity
The first step for creating a game is to create an empty Unity project or to launch your preexisting Unity project. If you're creating a new Unity project, we recommend you to name the project the same as your game ID (see
Requesting your game IDs). Then you'll have to import the provided SDK Unity Package (
Assets->Import Package->Custom Package, then navigate to
C:\Fun4Four\Developer and import
UnitySDKPackage.unitypackage) into your project.
That package contains three DLLs, which are called PhoenixInterfaceDllDotNet.dll, SDKUnityDLL.dll and SDKUnityEditorDLL.dll as well as predefined scenes which are already set up to work with.
The SceneLoader.cs script is used in the scene
Start.unity where it loads the game scene after some seconds. This scene also displays the image
StartImage.png which is used as game startup screen. You may change this to your own image.
Using the TABUnitySDK assets
Once you have imported this package to your project, you're ready to get in touch with the F4F SDK assets. For detailed informations about the whole library please checkout the TABUnitySDK API documentation contained within this help.
The most important class you'll need to use is called PhoenixController (note: Phoenix is the TAB internal code name of the F4F platform so you'll probably stumble about that term quite often). Access the PhoenixController singleton through it's singleton accessor PhoenixController.Instance.
The most important functions you need to get you game running within the F4F framework are:
- SetUnityAsReady should be called after successful startup of the game to notify the F4F framework to stop it's launch timeout timers
- LoadPlayerPositionsFromPhoenix should be called at the beginning of the game to retrieve the player positions from the F4F framework
- ResetIdleTime should be called after every player input to notify the F4F framework to reset it's user timeout timers
All the other functions are optional and are not implicitly necessary to initially run your Unity game.
Possible Fun4Four player setups
The following player position setups are available to you. You can configure those setups through the GameSettings.ini file. See the inline documentation within the GameSettings.ini file for more information. Each setup has a "nickname", like Line, Tower, or Plus.
Line setup for up to two possible players:
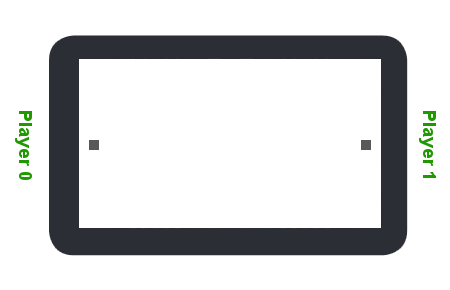
Line
Tower setup for up to two possible players:
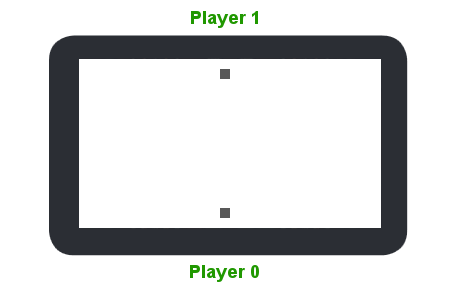
Tower
Plus setup for up to four possible players:

Plus
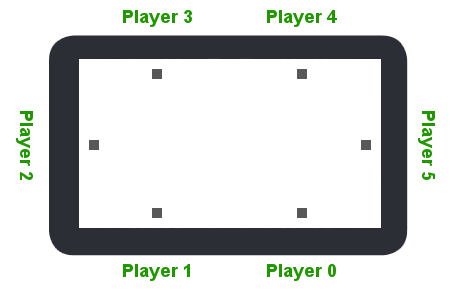
Square setup for up to four possible players:

Square
Six setup for up to six possible players:
Six
Running F4F games without the emulator
During game development you might be interested to launch your games directly from Unity, not using the F4F emulator. This is possible. However, the game will of course not be tied to any F4F environment, thus the F4F SDK methods need to behave as "simulators" of the F4F environment.
To set up that simulation behavior, the F4F SDK provides to you a custom Unity editor which allows you to configure the F4F SDK objects for use without the F4F framework. The editor is called the "PhoenixController" editor. You can configure all values there, which are usually provided to the game automatically by the F4F framework. Once the game is launched within the real F4F framework, the values will of course be ignored, and you'll get delivered REAL values from the system.
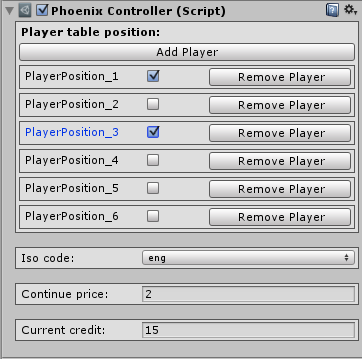
PhoenixController editor settings
You can set up the following simulation settings:
- Player table position
You can choose how many players are participating in your game, and which positions they occupy (see Possible Fun4Four player setups)
- ISO code (three-letter ISO 639-2/B)
This setting allows to change the current language setting. At the moment there are five supported languages:
- "eng" English
- "ger" German
- "fre" French
- "spa" Spanish
- "tur" Turkish
For more information about localization please see Localization of text
- Continue price
Set the price for one continue
- Current credits
Set the amount of current credits available to the game
Helpful hints
- At the beginning of your game code you have to call the SetUnityAsReady function to let the F4F framework know that the Unity game is ready
- Don't forget to reset the IDLE time (call the ResetIdleTime function) after every player input otherwise the game will end after 120sec IDLE time
- If you're working in a scene except the game scene, you'll have to add a Unity game object that has PhoenixController attached to it to the scene manually.
- Do not forget that when running games outside of the F4F emulator, you'll only get TEST data from all SDK methods, which you can change through the PhoenixController editor settings (see Running F4F games without the emulator)
- If you're running into an issue, where after inclusion of the TAB SDK components, your Unity project will fail saying it can not find assemblies like System.Windows.Forms - do not panic. Its a simple settings change. Go to File -> Build Settings -> Player Settings -> Other Settings -> and change compatibility level from ".NET 2 subset" to ".NET 2". Your project should now build fine.


